One of the most common locations for leaks and roof failures is near the flashing. But, what is flashing and why is it such a problem area?
What is flashing?
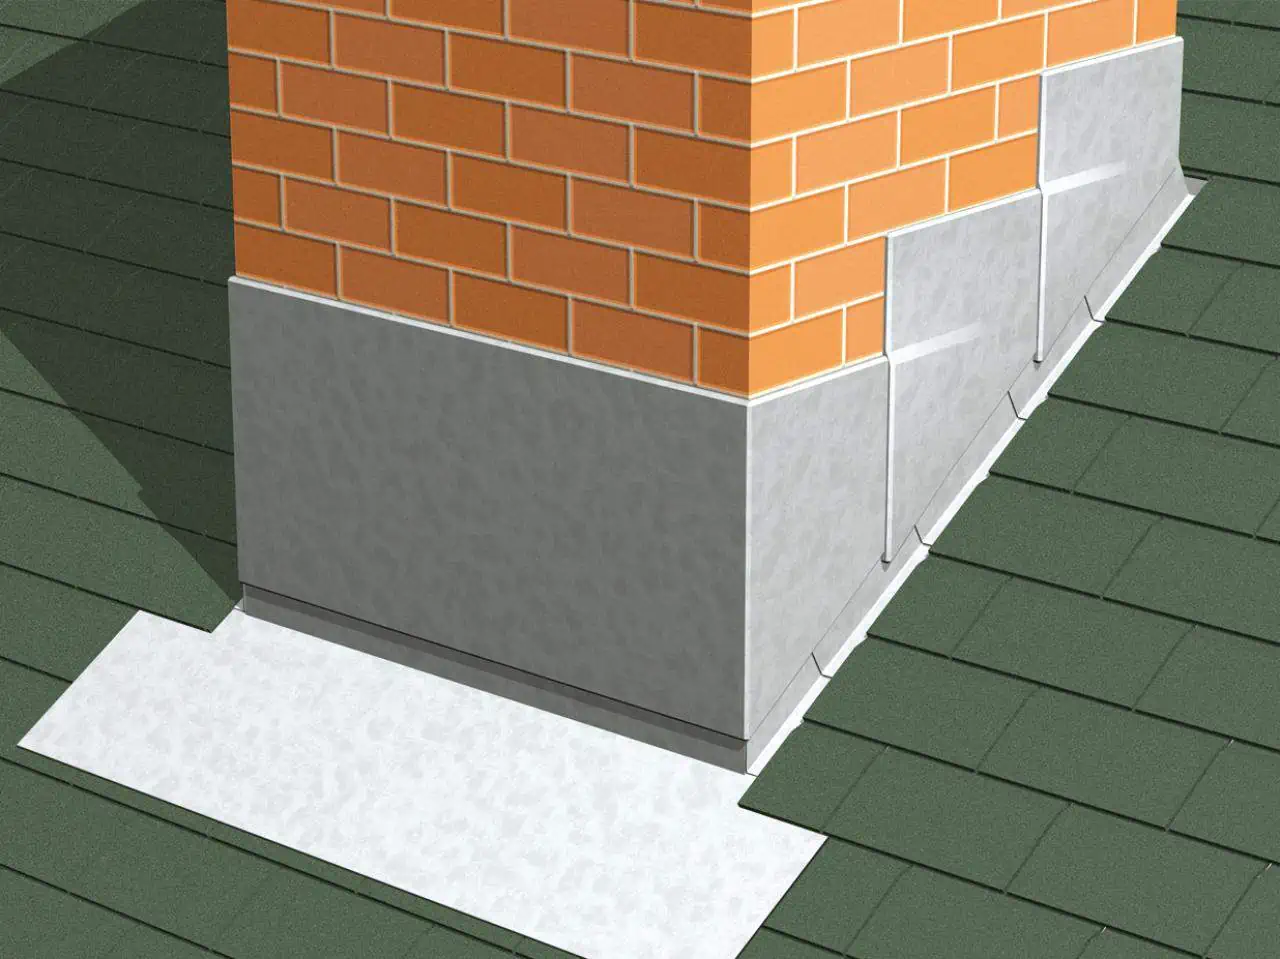
Flashing is a piece of sheet metal that covers joints or penetrations in a roof. Flashing is commonly used near chimneys, skylights, dormers or vent penetrations. It bridges the gap between where shingles stop and where the protrusion (like a vent pipe) is located. The purpose is to keep water out of where it doesn’t belong!
Commonly, flashing is installed too low, over the shingles, with a gap, without sealant, corroded, broken or missing altogether. In any of these cases, during rain, you may start to see water get beneath the flashing and then travel beneath your shingles. Once water is beneath your shingles, it can travel a long ways before it is noticed, making the cause of leaks difficult to trace.
Once water gets beneath shingles and begins to accumulate, it can lead to mold and wood rot. Then when it freezes, your shingles will be pushed up and broken, leading to a host of other problems. Huge problem!
There is one correct way to install flashing around various items on your roof and many, many incorrect ways. Many times, a homeowner or unlicensed contractor will attempt to repair or replace flashing without knowing the right method and will typically make matters worse.
Why is flashing so important?
Flashing is important because it helps protect your roof where it is weakest. If you think about it, a roof is a very durable surface, especially when using the right materials and when they are installed by Pros. But, you need holes in your roof, yes, intentional holes. These holes are where your cooking hood vent pipe comes through. There is a hole for your chimney. There are holes for vents, skylights, dormers and on and on. You cannot place a shingle over each of these holes to protect them. You need a product that will butt right up against the hole and seal off to protect it.
This is where flashing shines. Flashing needs to be cut a certain way, be a certain length and be sealed correctly in order to do its job. But if you get the installation part done correctly, you will have something that will keep your roof protected for many, many years.
How do I know if my flashing is installed correctly?
Let this be prefaced with, it is ALWAYS a good idea to have a Pro come look at any issue you may be having to get the best possible information. An article is no replacement for a professional opinion. Get professional advice!
- Flashing should be installed beneath shingles. If you only have flashing sitting on top of your shingles, it is not properly installed and will not provide any protection against leaks.
- Excessive use of sealant or caulk. If you see areas with a large amount of roofing mastic or caulk has been used, it may mean that someone is attempting to seal an opening with the use of sealant instead of flashing. Sealant will shrink, shrivel and crack and will not provide the same type of long-term protection you get from properly installed flashing.
- Continuous piece flashing instead of step flashing. Step flashing consists of short pieces of flashing, each installed to be overlapped by the shingle above. Shingle manufacturers require that step flashing be used at sidewalls. If you have only a continuous piece of flashing, this is incorrect and should be fixed.
- Corrosion or breaks. If you can see significant corrosion or holes in the existing flashing, there’s a good chance it has broken down and will fail soon, if it hasn’t already.
There are many more ways that flashing can be installed improperly, too many to list here. The best and most efficient way to ensure your roof flashing and entire roof system is ready to stand up to the elements this winter is by calling the Pros at Pro Home Improvement.
Proper flashing installation is one of the most important aspects of a durable, long-lasting roof system. Without flashing, your roof will leak like a sieve, causing thousands of dollars of damage and endless headache. To make sure your roof is in great shape, or to get a second opinion, call 888-776-1998 or scheduled an appointment with the Pros at Pro Home Improvement.

